Mobile apps are everywhere — from messaging and banking to fitness and gaming. At some point, many people ask: “Could I build an app too?” The honest answer is yes — and you can start even if you feel like a complete beginner.
This guide explains mobile app development in plain English with a practical, beginner-first mindset. You will learn the main approaches (native, cross-platform, PWA), how to choose a first stack without getting stuck, and what the real “building blocks” of an app look like (UI, state, storage, APIs, testing).
Quick outcomes (what you’ll be able to do after reading)
- Choose a first path (Android, iOS, Flutter, React Native, or PWA) based on goals and hardware.
- Understand the core parts of any mobile app: screens, navigation, state, storage, networking, and permissions.
- Build a small “ship-able” app idea with a realistic scope (and avoid common beginner traps).
- Know the basics of testing, debugging, and what’s involved in publishing.
1. What Is Mobile App Development?
Mobile app development is the process of designing, building, testing, and releasing applications that run on mobile devices such as phones and tablets. It includes both the visible UI (screens, buttons, layouts) and the invisible logic (state management, data storage, network calls, authentication, and security).
In practice, building an app usually means:
- Turning an idea into screens (UI + navigation).
- Implementing behavior (what happens on tap, swipe, input, offline/online states).
- Working with data (local storage and/or cloud sync through APIs).
- Testing (manual tests, debugging, basic automated checks over time).
- Shipping (release builds, store assets, compliance and updates).
A realistic first-app target
Aim for an app with 2–4 screens, one core feature, and local persistence. Example: a to-do list with categories and a simple “completed” toggle. This is big enough to teach the essentials — but small enough to finish.
2. Native, Cross-Platform & Web Apps: What’s the Difference?
Most beginner confusion starts here. There are many tools, but nearly every mobile app approach fits into one of these: native, cross-platform, or mobile web/PWA.
- Native apps: built specifically for one platform using official languages and SDKs. Android commonly uses Kotlin/Java; iOS uses Swift/Objective-C. Native gives the deepest integration and the most predictable performance.
- Cross-platform apps: built with frameworks like Flutter or React Native so most code can target both Android and iOS. You trade some platform-specific detail for speed and shared code.
- Mobile web & PWA (Progressive Web App): a website optimized for mobile that can behave like an app (home screen icon, offline caching, some device features). Great for content-first products and rapid iteration.
Quick comparison (beginner-friendly)
| Approach | Best for | Typical trade-offs |
|---|---|---|
| Native (Android/iOS) | Best performance, platform-first UX, advanced device features | Two codebases if you target both platforms |
| Flutter | Consistent UI across platforms, fast UI iteration, strong tooling | Learning Dart; some platform-specific work still exists |
| React Native | JavaScript/TypeScript ecosystem, reuse web knowledge, wide community | Bridges/native modules for deeper device features; ecosystem complexity |
| PWA | Content-first apps, rapid deployment, SEO-friendly experiences | Not all device features are equal; app store presence differs |
Real-life example
Imagine a habit tracker. Native Android might use Kotlin + Jetpack Compose; native iOS uses Swift + SwiftUI. Cross-platform options could be Flutter (Dart) or React Native (JavaScript/TypeScript). As a PWA, it can run in a browser and still feel “app-like” for many users.
There is no universal “best”. For a beginner, the best choice is the one that helps you ship your first small app without stalling on tooling decisions.
3. Choosing Your First Platform & Tech Stack
Beginners often lose weeks to “framework comparison”. A better approach is to choose based on constraints (your hardware, your goals, your current skills), then commit long enough to complete one small app.
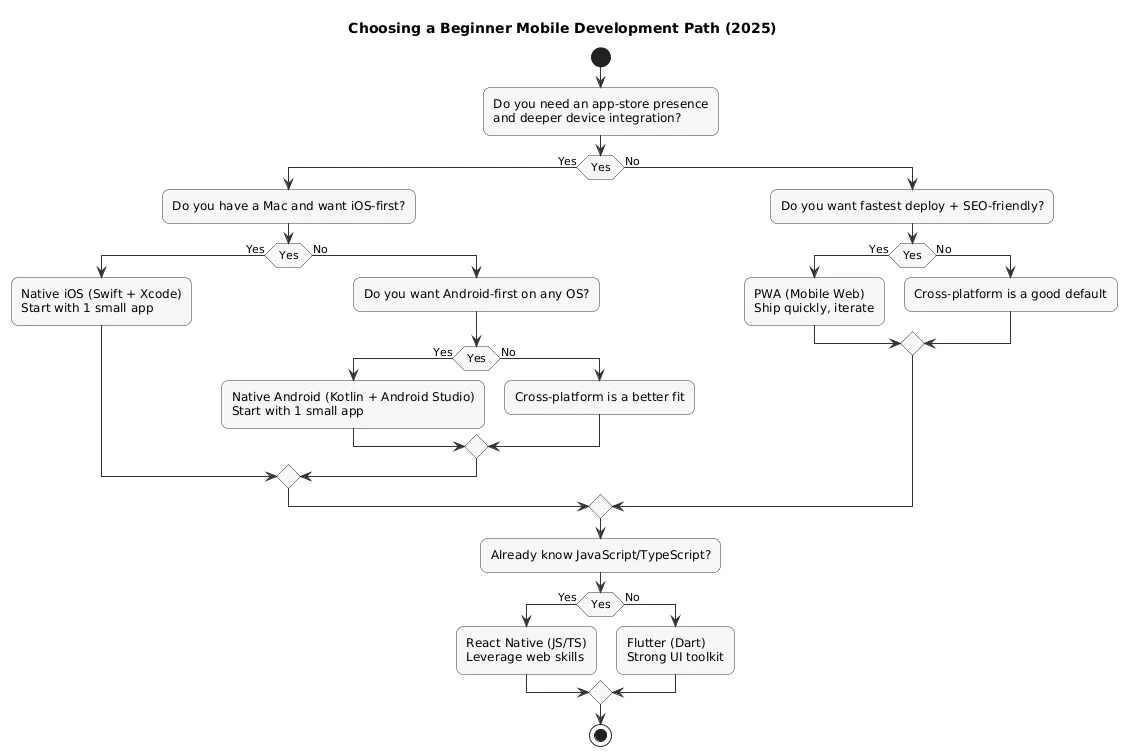
- If you already know JavaScript/TypeScript: React Native or PWA can feel natural.
- If you want one codebase and UI consistency: Flutter is a strong first pick.
- If you want the official platform path: Android (Kotlin) or iOS (Swift).
- If you only have Windows/Linux and no Mac: Android, Flutter, React Native, or PWA are typically easier to start with than pure iOS.
Commitment rule
Pick one stack and commit until you ship a tiny app. Switching stacks before you ship usually means you keep repeating setup and tutorials — without learning the real app-building skills.
Decision flow (diagram)
4. Core Building Blocks of a Mobile App
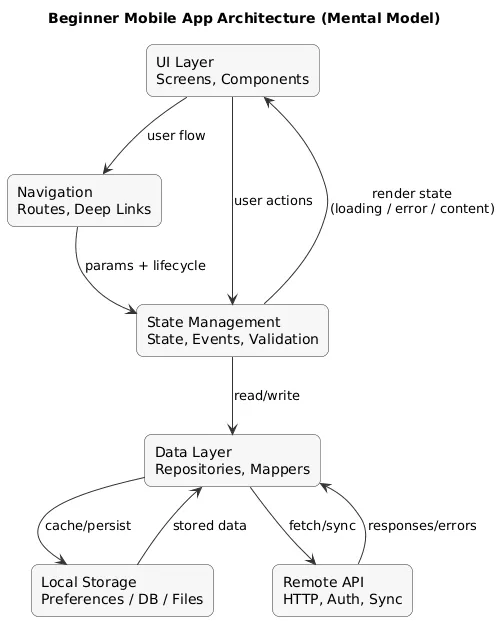
Frameworks differ, but the fundamentals repeat across almost every mobile app: UI, navigation, state, data, and integration. If you learn these concepts once, switching tools later becomes much easier.
- Screens & navigation: home, details, settings, and how users move between them.
- UI components: inputs, lists, cards, buttons, icons, tabs.
- State & logic: what the app “knows” right now (selected item, logged-in user, loading state).
- Storage: local preferences, files, or databases; sometimes caching API results.
- Networking: APIs for auth, syncing, content, and data updates.
- Platform features: permissions, notifications, camera, location, sensors.
A simple mental model (you can reuse everywhere)
Most beginner apps can be thought of as: UI → State → Data Layer → (Local storage / API). When something goes wrong, debugging becomes easier because you can ask: “Is it UI? state? data? networking?”
Beginner trap
Don’t over-architect your first app. You do not need advanced patterns on day one. You need clarity: predictable state updates, readable code, and a small scope you can finish.
5. Tools of the Trade: IDEs, Emulators & Devices
Typical mobile development setup includes:
- IDE: Android Studio (Android), Xcode (iOS), VS Code (commonly used with Flutter/React Native/PWA).
- Emulator/Simulator: virtual device for quick iteration and testing.
- Real device testing: catches performance issues and usability problems early.
- Version control (Git): enables safe experimentation and makes it easier to learn from mistakes.
Beginner setup checklist
- Install one IDE and run a “Hello World” on an emulator.
- Run the same app on a real phone (USB debugging / device pairing).
- Initialize a Git repository and commit after each milestone.
- Keep notes: errors you hit once are likely to come back later.
6. Designing & Building Your First Simple App
The fastest way to learn mobile development is to start small, repeat often. Your first app should be a single-purpose tool: to-do list, habit tracker, quote generator, timer, simple notes app.
Scope control: define your “Minimum Viable App”
Before coding, write down what your first version includes — and what it explicitly does not include. This keeps you from “accidentally” building a huge product.
MVP example: To-do app
- Includes: add task, mark done, list tasks, local saving.
- Not included (yet): login, sync, reminders, tags, themes, social sharing.
Beginner workflow (repeatable)
- Sketch the UI: draw 1–3 screens on paper or in a notes app.
- Build screens and navigation: get the basic layout working first.
- Add state & logic: make core interactions reliable (create/edit/delete).
- Persist locally: ensure data survives app restarts.
- Polish: spacing, labels, empty states, basic error handling.
- Share privately: a friend test is more valuable than endless internal tweaking.
Watch out
Don’t start with “a full social network” or “a full banking app”. Oversized ideas are the top reason beginners quit. Build a tiny version first, then iterate.
7. Working with Data, Storage & APIs
Most apps are either data apps (lists, profiles, dashboards) or interaction apps (camera, sensors, media). Beginners should learn data basics early because it applies to nearly every project.
Local storage: three common buckets
- Preferences / key-value: small settings like theme, onboarding completion, simple flags.
- Files: exporting/importing, cached content, media files (with care).
- Local database: structured lists, notes, offline-first experiences.
APIs: what you should practice first
- Loading state: show the user something while fetching data.
- Error state: handle timeouts, no internet, invalid responses.
- Retry & refresh: make the app recover without a restart.
- Caching: keep the last successful result to improve perceived speed.
Good beginner milestone
Build a small app that fetches data from one API endpoint and displays it in a list with a details screen. This teaches networking, parsing, state, navigation, and UI — all at once, in a manageable scope.
8. Testing, Debugging & Publishing Basics
Mobile apps break in real-world conditions: weak internet, background/resume, low battery, small screens, older devices. Testing is not optional — it’s how you protect user experience and your time.
Beginner-friendly debugging habits
- Reproduce the issue twice before “fixing” it.
- Log state transitions (what changed, when, and why).
- Test small inputs and “weird” inputs (empty strings, huge text, offline mode).
- Verify behavior after app restart (storage bugs often hide there).
Release pipeline (diagram)
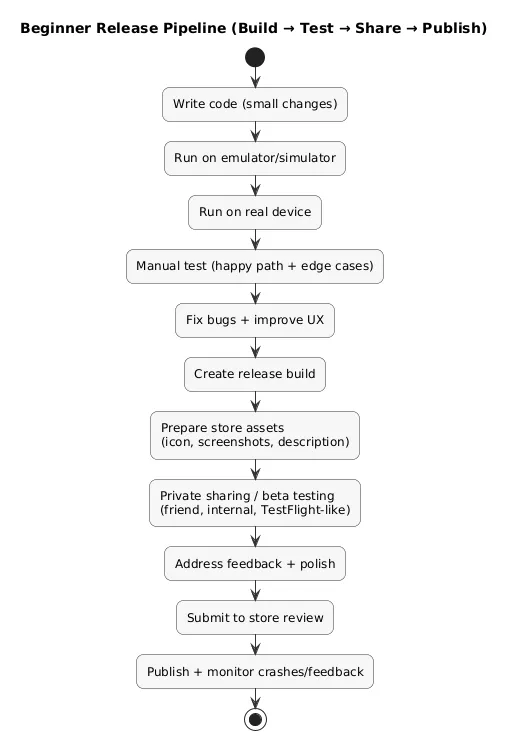
Publishing basics (what usually surprises beginners)
- Store assets: icon, screenshots, short/long description, privacy notes.
- Policy compliance: permissions should match features; avoid asking for access you don’t need.
- Release builds differ: debug builds are not the same as production builds (performance and logging can change).
- Updates are normal: shipping once is not the finish line — maintenance is part of the craft.
You do not have to publish your very first app publicly. A strong intermediate step is private sharing: Android APK sharing (carefully) or iOS beta distribution (e.g., TestFlight). It helps you learn shipping without store pressure.
9. Common Beginner Mistakes & How to Avoid Them
These are the mistakes that most often slow beginners down — and the fixes that work:
- Switching stacks constantly: choose one path, ship one tiny app, then evaluate.
- Starting too big: define an MVP and write down what’s “not included yet”.
- Copy-pasting without understanding: pause and explain each block to yourself (even briefly).
- Ignoring real device testing: emulators are useful, but real phones reveal the truth.
- No version control: Git turns experimentation into learning instead of fear.
- Weak error handling: most beginner apps fail on bad internet; build a loading and error state early.
A simple quality bar
Before calling an app “done”, ensure: empty states look fine, errors are visible and understandable, and your core feature works after app restart. This alone moves a beginner project from “toy” to “useful”.
10. Learning Path & Practice Project Ideas
You do not need a perfect curriculum. You need a sequence of projects where each one adds exactly one new skill. Here is a practical progression you can follow:
- Week 1: tool setup + one-screen app (button, text, list).
- Week 2: navigation (2–3 screens) + passing data between screens.
- Week 3: local persistence (settings or small database) + basic empty/error states.
- Week 4: connect one API endpoint + caching last successful result.
- Month 2: ship a small app to a friend + collect feedback + iterate once.
Practice project ideas (small but meaningful)
- To-do list with categories and a search bar.
- Daily mood tracker (emoji + short note) with weekly history view.
- Recipe manager with offline saving.
- Flashcards app for language learning with spaced repetition “lite”.
- Workout log with timers and simple charts.
A useful rule: if you cannot finish the first version in one weekend, it’s probably too big for a beginner project. Cut features until it fits.
11. Frequently Asked Questions About Mobile Development
Do I need prior programming experience to build mobile apps?
No. Prior experience helps, but it’s not required. The key is to learn incrementally and build small projects that force you to practice: UI + navigation + state + storage. Consistency beats “perfect understanding” on day one.
Which should I learn first: Android or iOS?
Start with what matches your daily setup and hardware. If you have a Windows PC and Android phone, Android is usually the most straightforward. If you already have a Mac and use iPhone daily, iOS can be a natural start. If your goal is both platforms, consider Flutter or React Native.
Do I need a powerful computer to develop mobile apps?
A mid-range laptop is typically fine, but emulators and IDEs can be resource-heavy. If your machine struggles, rely more on testing on a real device, keep projects small, and close background apps while building.
How long does it take to build my first simple app?
Many beginners build their first usable app in a few evenings if they follow a focused tutorial and keep scope small. The biggest delay is usually not coding — it’s changing ideas and tools too often.
Do I have to pay to publish apps?
You can learn and run apps on your own devices for free. Public publishing typically requires a paid developer account. As a beginner, it’s completely valid to share privately first and only pay when you feel confident the app is worth distributing.
12. Final Thoughts & Next Steps
Mobile app development looks intimidating until you break it down into reusable parts: screens, navigation, state, data, and testing. Choose one path, ship one tiny app, and you will have a foundation you can grow on quickly.
If you’d like to go further, explore other resources in the Mobile Development guides on All Days Tech for step-by-step lessons and focused deep dives.
Key mobile development terms (quick glossary)
- Android
- A mobile operating system by Google, used by many device manufacturers worldwide.
- iOS
- Apple’s mobile operating system for iPhone and iPad; apps are typically built with Swift in Xcode.
- Native app
- An app built with official platform tools (Kotlin/Java for Android, Swift for iOS) with deep device integration.
- Cross-platform framework
- A toolkit that lets you target multiple platforms with shared code, such as Flutter or React Native.
- IDE
- Integrated Development Environment — software used to write, run, and debug code (Android Studio, Xcode, VS Code).
- Emulator / Simulator
- A virtual mobile device that runs on your computer for fast testing and iteration.
- API
- A way for apps to communicate with servers and services to fetch or send data.
- State
- The current information your app is working with (selected item, logged-in user, loading state, etc.).
- PWA
- Progressive Web App — a web app that behaves more like a native app, often including offline support and home-screen install.
Worth reading
Recommended guides from the category.