
iOS development becomes much easier once you stop thinking in “frameworks” and start thinking in building blocks: screens, navigation, state, data persistence, networking, permissions, and release. The tools change over time, but these fundamentals keep paying dividends.
This guide is SwiftUI-first (modern iOS workflow) and focuses on what beginners need to ship a small app: not just “how to write Swift”, but how to build a complete feature with a predictable data flow, reliable storage, robust error handling, and a release-ready build.
Beginner outcome (what “success” looks like)
- You can create a SwiftUI app with 2–4 screens and predictable navigation.
- You can model app state (loading/error/content) and keep side effects out of view bodies.
- You can persist data locally and make one API request with good UX (loading + retry).
- You can archive a release build and understand the core steps for App Store submission.
1. What iOS Development Covers in 2025
Modern iOS development typically means: Swift for code, SwiftUI for UI, and a workflow built around state-driven interfaces. Even if you later learn UIKit for legacy projects, a SwiftUI-first foundation is a strong beginner path.
- Language: Swift (default for new iOS apps).
- UI framework: SwiftUI (declarative, state-driven UI).
- State & data flow: property wrappers, Observable models, predictable updates.
- Data: preferences/files/database (Core Data / SwiftData).
- Networking: URLSession + async/await + error handling.
- Platform integration: permissions, notifications, background modes (as needed).
- Shipping: signing, archiving, App Store Connect listing, review constraints.
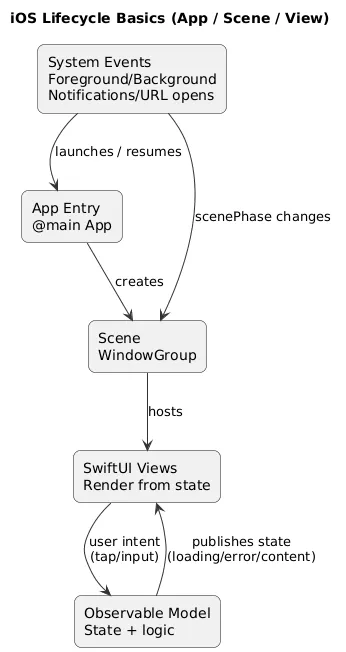
The mental model you’ll reuse
Most iOS apps can be described as: SwiftUI Views → State → Data Layer → (Storage / API). When something breaks, debugging becomes simpler because you can isolate the layer that is misbehaving.
Lifecycle overview (diagram)
2. Tools & Setup: Xcode, Simulator, Signing Basics
iOS development requires a Mac because Xcode is Apple’s official IDE and build toolchain. Your day-to-day setup usually includes: Xcode, Simulator, at least one real device, and (eventually) signing configuration.
- Xcode: editor, build system, debugger, Instruments, archiving.
- Simulator: fast iteration across device sizes and iOS versions.
- Real device: critical for validating performance, permissions, camera, push, and real-world behavior.
- Signing basics: team selection, bundle identifier, certificates/profiles (often auto-managed by Xcode for beginners).
Real-device check
Do not treat Simulator success as “done”. Validate your app at least once on a physical iPhone: permission prompts, keyboard behavior, and performance can differ.
Beginner setup checklist
- Create a new SwiftUI project and run it in Simulator.
- Run the same project on a real iPhone (USB / device pairing).
- Set a unique bundle identifier (your domain style is ideal).
- Initialize Git and commit after each milestone (setup, first screen, navigation, persistence, networking).
3. Project Structure: Targets, Info.plist, Entitlements
Beginners often ignore project configuration until release day—then it becomes painful. A short understanding here saves hours later.
- Targets: your app variant(s). You might later add extensions or test targets.
- Bundle ID: unique identifier for signing and App Store listing.
- Info.plist: app metadata plus permission usage strings (camera/photos/location/etc.).
- Entitlements: capabilities like push notifications, iCloud, background modes, keychain sharing.
- Assets: app icon, colors, images, localization strings.
Practical rule
Add permissions and capabilities only when you actually implement the feature. Extra permissions create trust issues and can complicate review and privacy disclosures.
4. Swift Basics You Actually Need for iOS
You do not need to master all of Swift before you build iOS apps. You need a focused subset that shows up everywhere: optionals, value vs reference types, protocols, error handling, and async/await.
Swift concepts that unlock real app work
- Optionals: safely handle missing values without crashes.
- Struct vs class: value semantics are common in SwiftUI models; reference types are useful for shared mutable state.
- Protocols: enable clean boundaries and testability (especially for services).
- Errors: use typed errors and user-friendly messaging.
- Concurrency: async/await is a practical default for networking and I/O.
// A beginner-friendly pattern: explicit UI states
enum LoadState<T> {
  case idle
  case loading
  case success(T)
  case failure(message: String)
}
5. SwiftUI Basics: Views, Layout, Modifiers
SwiftUI is declarative: instead of manually updating UI elements, you declare what the UI should look like for a given state. When state changes, SwiftUI re-renders what needs updating.
- Views: Text, Button, Image, List, Form, NavigationStack, TabView.
- Layout: VStack/HStack/ZStack, Grid, safe areas, spacing, alignment.
- Modifiers: style + behavior (padding, font, foregroundStyle, task, onAppear).
- Previews: fast iteration; test multiple states (loading/error/content).
SwiftUI quality bar
Every screen should have at least: an empty state, a loading state (if it loads data), and a readable error state. These three dramatically improve perceived app quality and reduce frustration.
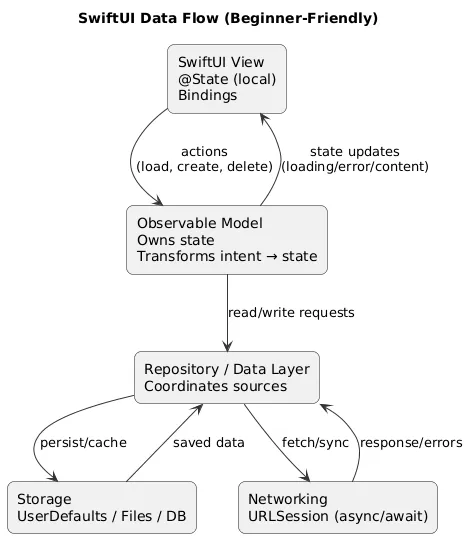
6. State & Data Flow: @State, Observable, and Side Effects
The biggest SwiftUI beginner problem is mixing view rendering with side effects (networking, file I/O). The fix is a simple separation of responsibilities:
- Views: render state and emit user intent (tap, input, refresh).
- Observable model: owns state transitions and business logic.
- Services: networking/storage implementations behind an interface.
SwiftUI data flow (diagram)
Avoid this beginner trap
Do not start network requests directly inside a view body. Trigger work in controlled lifecycle points (task/onAppear) via a model method, and make state transitions explicit.
Practical boundary: “one responsibility per layer”
If your view file contains URLSession calls, JSON decoding, and storage logic, maintenance becomes hard fast. Move those into services and keep the view focused on UI and user intent.
7. Navigation: Stacks, Tabs, and Deep Links
A clean navigation structure is one of the easiest ways to make a beginner app feel “professional”. Start simple and scale when needed.
- NavigationStack: push/pop flows (lists → details → edit).
- TabView: top-level app sections (home/search/settings).
- Routes: model navigation with IDs/types instead of ad-hoc string paths.
- Deep links: optional later step when you need shareable URLs or external launches.
Beginner navigation pattern
Build list → details first. Only then add edit/create flows. This order prevents you from over-building before the core navigation feels correct.
8. Permissions, Privacy & Info.plist Copy
On iOS, permissions are both a technical requirement and a trust decision. Users decide in seconds whether they feel safe granting access. Two things matter:
- Usage descriptions in Info.plist: the text users see in permission prompts.
- Timing: request permission only at the moment it is needed, not on first launch “just in case”.
Common permissions and what to include
| Permission | Typical use | Good prompt language (user benefit) |
|---|---|---|
| Camera | Scan, capture photos | “Allow camera access to scan receipts and attach them to your entries.” |
| Photos | Pick an image | “Allow photo access so you can choose a profile image for your notes.” |
| Location | Nearby features | “Allow location to show weather for your current area.” |
| Notifications | Reminders | “Enable reminders so you don’t miss your scheduled check-ins.” |
Permission copy rule
Write what the user gains, not what your code does. Avoid technical terms like “access the sandbox” or “store tokens”. Keep it outcome-focused.
9. Storage Basics: UserDefaults, Files, Core Data / SwiftData
Storage choice depends on data shape and complexity. Beginners should start with the simplest option that fits, then upgrade when requirements force it.
Storage options (quick selection guide)
| Option | Best for | Common mistakes |
|---|---|---|
| UserDefaults | Small settings, flags, simple preferences | Storing large data blobs or complex lists |
| Files | Documents, exports, cached assets | Not handling errors, writing on main thread |
| Core Data / SwiftData | Structured lists, relationships, offline-first apps | Overbuilding the data model too early |
| Keychain | Tokens/credentials (sensitive) | Using it for non-sensitive data |
Beginner trap
If your first app is a simple checklist, do not jump straight into complex persistence patterns. Start simple, ship, then refactor once you understand your real data needs.
10. Networking Basics: URLSession, async/await, Errors
Networking is where “toy apps” become real apps. The key is not only making a request, but handling reality: slow internet, timeouts, server errors, and invalid data.
Beginner networking requirements (non-negotiable)
- Loading state: the UI must show progress.
- Error state: show a friendly message and a retry path.
- Timeout/offline behavior: don’t freeze or silently fail.
- Safe decoding: avoid crashing on unexpected JSON.
Networking UX checklist
- Show loading UI
- Handle offline and timeout
- Handle non-200 responses
- Show a user-friendly error + Retry
- Log technical details for debugging (not to the user)
Practical pattern: service + typed errors
Keep URLSession code in a service layer, return a typed result, and translate technical errors into user-readable messages at the model layer. This keeps UI simple and makes testing easier.
11. Testing Basics: Unit, UI, and Practical Regression Checks
You do not need a huge automated test suite on day one, but you should build a repeatable “regression routine”: the set of flows you always re-check after changes.
- Unit tests: models and logic (state transitions, validation, formatting).
- UI tests: one or two critical flows (create item, delete item, search).
- Manual regression list: your personal checklist of “must not break” screens and actions.
Beginner testing win
Test your app in three situations: first launch, after restart (persistence), and offline (network error UX). These scenarios reveal the majority of beginner bugs.
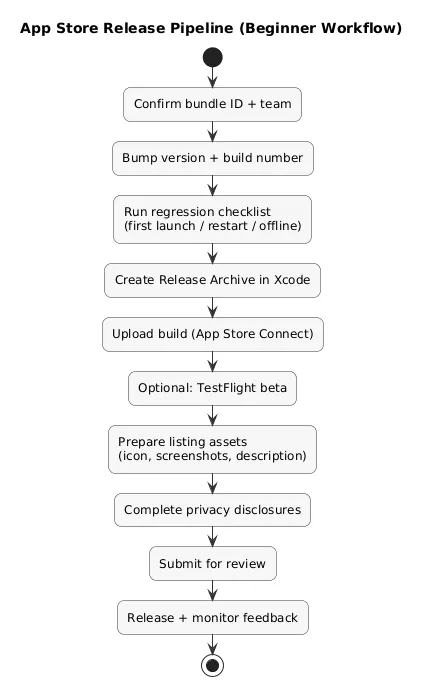
12. Release Checklist: Archive, App Store Connect, Review
Shipping iOS apps is a separate skill from building them. The goal is to reduce surprises by preparing store assets and privacy info early.
Release workflow (diagram)
Before you archive
- Versioning: bump version + build number.
- Signing: correct team + bundle ID; verify it matches App Store Connect entry.
- Permissions: only request what you use; Info.plist strings are clear and truthful.
- Stability: test on at least one real device and more than one screen size in Simulator.
App Store Connect preparation
- Assets: icon, screenshots, promotional text (optional), description that matches actual features.
- Privacy: disclosures match what the app collects/uses (and why).
- Support: support URL and contact email are consistent and monitored.
Fast win
Draft your App Store listing early. It forces a clear value proposition and prevents last-minute permission and privacy surprises.
13. FAQ: iOS Basics
Is Swift enough to build production iOS apps?
Yes. Swift is the default for modern iOS development and is widely used in production apps. You may still encounter Objective-C in legacy code, but it is rarely required for a beginner’s first project.
Should I learn SwiftUI first?
If you are starting in 2025, SwiftUI is a practical default. UIKit is valuable for older apps and certain advanced cases, but SwiftUI offers a faster path to building UI driven by state.
Do I need MVVM for a first app?
You don’t need heavy architecture, but you do need boundaries. Separate views from state logic and keep networking/storage in services. This is enough for most beginner apps and keeps refactoring manageable.
How do I test across different devices?
Use Simulator to cover many screen sizes and iOS versions, but validate key flows on a physical iPhone. Real devices reveal performance issues and permission behavior most reliably.
What is the easiest first iOS app to build?
A notes app, habit tracker, or checklist app is a great first project: it teaches navigation, state, and local storage without requiring complex backend work.
Key iOS terms (quick glossary)
- Xcode
- Apple’s IDE for iOS development, including Simulator, build tools, archiving, and debugging.
- Swift
- Apple’s modern programming language used for iOS development.
- SwiftUI
- A declarative UI framework where your interface is rendered from state.
- Info.plist
- A configuration file that includes metadata and permission usage descriptions shown to the user.
- Entitlements
- Capability flags enabling platform features like push notifications or iCloud.
- URLSession
- Apple’s networking API used to make HTTP requests.
- Codable
- A protocol for encoding/decoding data (commonly JSON) into Swift types.
- Core Data / SwiftData
- Persistence frameworks for structured local data storage.
Worth reading
Recommended guides from the category.