The best beginner IoT projects are the ones you can finish end-to-end: a sensor reading that reliably reaches a dashboard, plus a small alert or automation that reacts to it. That “boring completeness” is what turns a demo into a real system.
This guide gives you 25 practical project ideas organized by difficulty and scope. Each idea includes what it teaches, what parts you need, and the most common pitfalls (power, Wi-Fi, reconnect logic, and security). If you’re building a portfolio, the goal is not to show off complexity—it’s to show that you can ship a reliable, documented system.
Beginner strategy that works
- Start with one device + one sensor on USB power.
- Only add MQTT/dashboard after local readings are stable.
- Add one alert with a cooldown (avoid spam).
- Prove recovery: reboot the device and router and confirm it auto-recovers.
1. How to Pick an IoT Project You’ll Actually Finish
Most unfinished IoT builds fail due to scope and “hidden work” (power, packaging, networking, and edge cases). Use these constraints to pick a project that ships:
- Clear outcome: one sentence describing success (e.g., “Alert me when humidity exceeds X for 10 minutes”).
- Short feedback loop: you can test changes in minutes.
- One new risk at a time: new sensor or new protocol or new dashboard—never all at once.
- Power first: stable USB power beats batteries for your first 2–3 projects.
- Document early: a README and wiring photo on day one reduces “I’ll remember later” failures.
Safety note (important)
Beginners should avoid exposed mains wiring. For AC loads, use certified smart plugs or professionally rated enclosures/modules. You can build a strong IoT portfolio with sensors, dashboards, and low-voltage control without touching mains.
2. Quick Project Picker (choose in 60 seconds)
Pick based on what you want to learn. This table is intentionally practical (time and complexity matter).
| Goal | Best first project | Typical parts | What you learn |
|---|---|---|---|
| Learn sensors + wiring | Temp/humidity monitor | ESP32 + temp/humidity sensor | GPIO basics, sampling, calibration mindset |
| Learn dashboards | Sensor → chart with last seen | ESP32 + MQTT + dashboard host | Data flow, timestamps, visualization |
| Learn alerts | Leak detector notification | Water sensor + buzzer/notification | Thresholds, cooldown, false positives |
| Learn actuation | Button → relay (low voltage) | ESP32 + button + relay module | Debounce, safety, idempotent commands |
| Learn “real IoT” reliability | Multi-room sensor nodes | 3× ESP32 + MQTT + naming | Reboots, reconnect, monitoring, scaling |
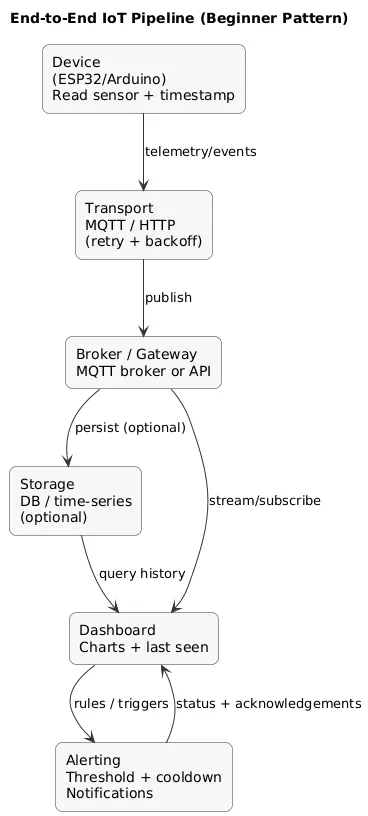
3. The End-to-End Pattern: Sensor → Transport → Storage → Dashboard → Alert
Regardless of hardware, most complete IoT projects follow the same architecture. If you internalize this pattern, you can “compose” new projects by swapping sensors and rules instead of reinventing everything.
End-to-end pipeline (diagram)
Portfolio angle
A project with a dashboard, timestamps, and a visible “device health / last seen” indicator looks like an operational system. Recruiters and readers recognize reliability thinking immediately.
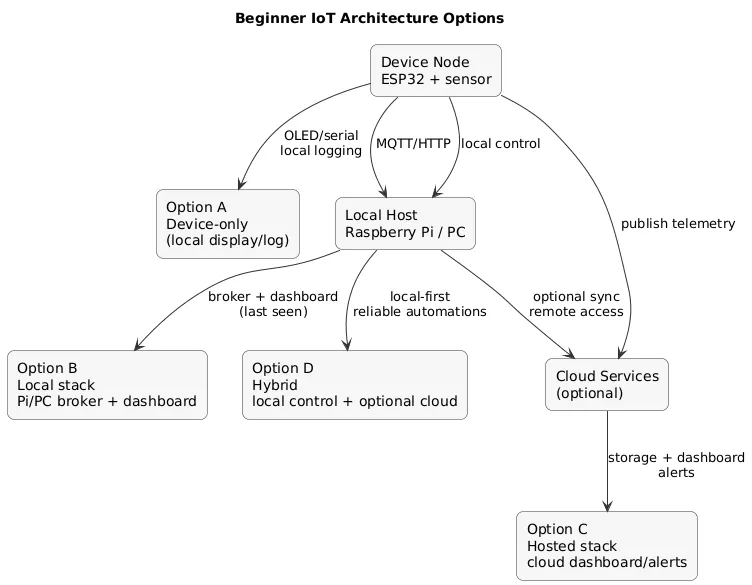
4. A Beginner IoT Stack (ESP32 / Arduino / Raspberry Pi)
You can build IoT projects in many ways, but beginners do best with a small, repeatable stack that minimizes friction:
- ESP32: the default choice for Wi-Fi IoT prototypes (sensors + simple control).
- Arduino (no Wi-Fi): great for pure sensor/actuator learning; add networking later.
- Raspberry Pi (optional): useful as a “home server” to host a broker and dashboard.
- Messaging: MQTT is a friendly step up from “print to serial” and maps well to real systems.
- Data format: keep payloads boring (simple JSON or key-value) and include timestamps + units.
Architecture options (diagram)
Avoid early complexity
Don’t start with batteries + deep sleep + camera streaming + cloud platform + mobile app. Build in layers: stable readings → reliable transport → dashboard → alert → multi-device → OTA.
5. Tier 1 (Easy): Single-device Projects
Tier 1 projects teach sensor basics, sampling, thresholds, and simple UI feedback. Keep them small and finishable.
-
Temperature & humidity monitor: read values,
show on serial/OLED, log min/max.
Upgrade: add comfort bands (too dry / ok / too humid). -
Light level monitor: measure brightness and drive
an LED bar or a single indicator LED.
Common pitfall: noisy readings—use smoothing (moving average). -
Door/window contact event logger: detect open/close
and store last event in memory.
Upgrade: add a buzzer if door stays open too long. -
Plant moisture reminder (indicator-only): classify
as “dry/ok/wet” and show a simple status.
Common pitfall: moisture sensors can corrode—treat as learning hardware. -
Button-to-action (debounced): toggle a relay or
change an LED mode with proper debounce.
Upgrade: long-press vs short-press behaviors. - IR remote sniffer: read IR codes and log them; later use them to control a device.
- Sound level indicator: measure relative sound levels and display “quiet/normal/loud”.
- Simple people counter demo: two IR sensors to estimate direction (enter/exit) in a doorway mockup.
6. Tier 2 (Medium): MQTT, Dashboards, Alerts
Tier 2 is where projects start looking “real”: you move data across the network, visualize it, and react to it. The core skill is not MQTT itself—it’s consistent topics, timestamps, and clear monitoring.
Recommended topic naming (simple)
home/<room>/<device>/state
home/<room>/<device>/telemetry
home/<room>/<device>/events-
Sensor → MQTT → dashboard: publish every 30–60
seconds; chart values.
Add: RSSI + uptime telemetry tile. -
Leak detector alert: water sensor triggers
notification; add cooldown to avoid repeated alerts.
Add: “acknowledged” state so the system stays quiet once handled. - Room comfort index: compute a comfort score from temperature/humidity; publish both raw + derived metrics.
-
Mailbox notifier (mains-powered prototype): contact
sensor triggers an event and “last opened” timestamp.
Upgrade: battery version later, once baseline is stable. -
Smart fan controller (low-voltage): temperature
crosses threshold → relay toggles fan.
Guardrail: hysteresis (avoid rapid on/off). -
Motion-based lighting (safe variant): motion event
triggers a smart plug-controlled lamp (no mains wiring).
Guardrail: disable during “sleep mode”. - Package temperature logger: log temperature every minute and render a daily report chart.
- Air quality trend dashboard (starter): store readings, chart trend, alert on sustained bad periods.
- Simple “device status” panel: show last seen, battery estimate, uptime, and error count for one device.
The one metric that saves debugging time
Always publish a last seen timestamp (or heartbeat). Without it, every failure looks the same (“it stopped”).
7. Tier 3 (Hard): Multi-device Systems, OTA, Reliability
Tier 3 is about operational discipline: naming, versioning, monitoring, and recovery from failures. It’s what separates hobby demos from systems you can maintain.
-
Multi-room sensor network (3–5 nodes): consistent
device IDs; dashboard per room + global view.
Deliverable: documentation describing how to add a new node. -
Local rule engine: combine multiple signals (motion
+ light level + time window) to control a device.
Guardrail: manual override path (pause automation for 10–30 minutes). -
OTA update pipeline (starter): a safe process to
upgrade firmware without USB.
Discipline: include firmware version in telemetry and confirm rollout success. -
Anomaly detector (edge rules): detect “too fast
change” or “unexpected pattern” and alert.
Tip: start with simple heuristics before “AI”. - Offline-first buffering: queue readings during outages and flush later (with timestamps preserved).
- Device watchdog + self-recovery: restart networking stack after repeated failures; report error counters.
- Fleet dashboard: show firmware versions across devices and highlight outdated nodes.
- Mini “SLA” report: daily uptime percentage and number of disconnects per device.
8. Parts List: What to Buy (minimal, low-regret)
A realistic starter kit that supports most projects in this guide:
- ESP32 dev board (1–3 units if you want a multi-node project)
- Breadboard + jumper wires
- Reliable USB power adapter (power issues are a top beginner failure mode)
- Core sensors: temp/humidity + light sensor or motion/contact sensor
- Optional: small OLED display for local status
- Optional: buzzer/LED for local alerts
- Optional: relay module for low-voltage switching (avoid exposed mains wiring)
Beginner purchase rule
Buy one “boring” sensor first (temperature/humidity) and one event sensor (motion/contact). That combination covers most learning paths.
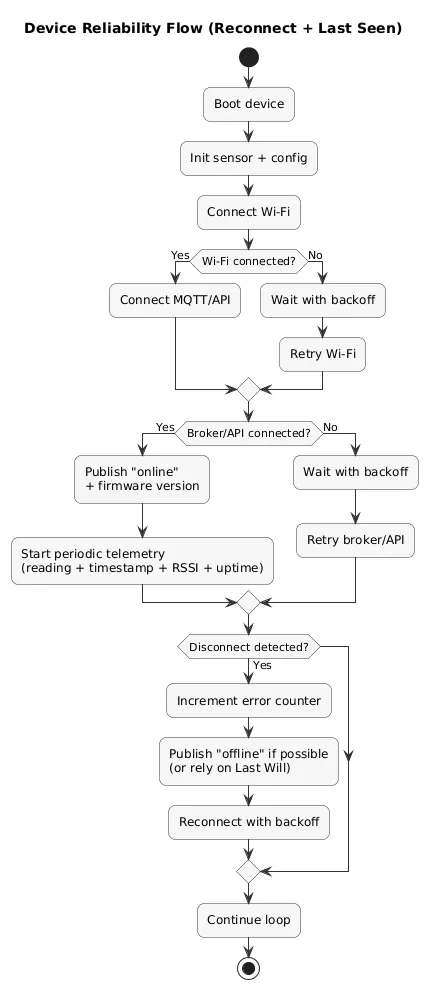
9. Reliability Checklist: Power, Reconnects, “Last Seen”
IoT projects fail for boring reasons. Reliability is a skill you can learn systematically:
Reliability flow (diagram)
Non-negotiables for beginner reliability
- Stable power: unexplained resets are often power or cables.
- Reconnect logic: if Wi-Fi/MQTT drops, retry with backoff (avoid tight loops).
- Last seen / heartbeat: publish timestamps and device health metrics.
- Idempotent commands: the same command sent twice should not break the system.
- Simple schemas: keep payloads stable; avoid frequent format changes without versioning.
Device loop (conceptual)
- On boot: connect Wi-Fi → connect MQTT → publish "online" + firmware version
- Every N seconds: publish readings + timestamp + RSSI + uptime
- On disconnect: retry with backoff; keep a counter
- Publish a "last will" offline message if your broker supports it
10. Security Basics: Don’t Ship Default Passwords
You do not need enterprise security to be safer than most hobby builds. You need a baseline:
- Change defaults: broker, dashboard, router, and device credentials.
- Segment IoT: guest/VLAN when possible; keep your main devices separate.
- Don’t expose MQTT publicly: avoid open ports; prefer VPN-like access if remote control is needed.
- Least privilege: only the controller/dashboard should talk to the broker if you can.
- Update discipline: track firmware versions; don’t “forget” devices for months.
Security reality check
If you can reach your broker from the public internet with a default password, you don’t have an IoT project—you have a liability.
11. End-to-End Project Checklist (ship a complete build)
- Hardware: stable wiring, stable power, sensor reads correctly across 30+ minutes.
- Firmware: error handling, reconnect, backoff, and telemetry included.
- Data: timestamps + units + consistent schema.
- Transport: consistent MQTT topics; retained messages/last-will where appropriate.
- Dashboard: charts + last seen + device health tile.
- Alert: one threshold-based notification with cooldown and test procedure.
- Security: non-default credentials; no public exposure; documented network assumptions.
- Docs: README with wiring, configuration, and troubleshooting steps.
Fast win (looks professional)
Add a “device health” tile: last seen, RSSI, uptime, and firmware version. It makes your project maintainable and easy to demo.
12. FAQ: Beginner IoT Projects
Do I need a cloud platform to build IoT projects?
No. Many beginner projects are best built locally first (MQTT + dashboard on a Raspberry Pi or your PC). Cloud is a later step once reliability and security basics are proven.
What’s the best microcontroller for Wi-Fi IoT?
ESP32 is a common beginner default because it supports Wi-Fi/Bluetooth and has broad community examples.
How do I store IoT data?
Start with a simple approach (file/database behind your dashboard). The key is consistent timestamps and units so your charts are meaningful.
How do I make sure my IoT project recovers after reboot?
Test it explicitly: reboot device and router. Your firmware should reconnect automatically, and the dashboard should show last seen and offline states clearly.
Key IoT project terms (quick glossary)
- ESP32
- A low-cost microcontroller with Wi-Fi and Bluetooth, widely used for beginner IoT projects.
- MQTT
- A lightweight publish/subscribe messaging protocol commonly used in IoT.
- Broker
- The server that routes MQTT messages between publishers and subscribers.
- Topic
- The channel name messages are published to (e.g., home/livingroom/temperature).
- Telemetry
- Operational metrics about a device (RSSI, uptime, error counts, firmware version).
- Last seen
- A timestamp or heartbeat indicating a device is online and reporting.
- Backoff
- A retry strategy that waits longer between reconnect attempts to reduce network load and flapping.
- OTA
- Over-the-air updates: updating firmware without a USB cable.
Worth reading
Recommended guides from the category.